


Your cart
There are no more items in your cart
In any laboratory that works with volumetric pipettes or graduated pipettes, safe liquid handling is just as important as reading accuracy. Rubber pipette bulbs (often called propipettes) and other pipette aspiration devices allow users to aspirate and dispense liquids without mouth pipetting, reducing risk and improving reproducibility. Even though these tools may look simple, choosing the right model and using the correct technique makes a major difference in routine tasks such as solution preparation, quality control, clinical analysis, and research.
This article explains what rubber bulbs are, what types of aspiration devices exist, and—most importantly—how to use them step by step. We will use the classic A / S / E valve configuration as a reference (air release, suction, and emptying), and include practical recommendations to prevent bubbles, spills, contamination, and volume errors.
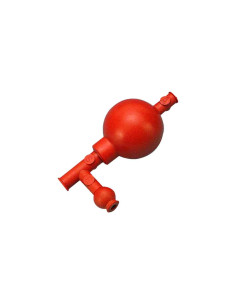
A rubber pipette filler is a manual accessory that attaches to the top of a pipette to create a vacuum and aspirate liquid. It is made from flexible rubber or an elastomer. When compressed and released, it generates suction that raises the liquid inside the pipette.
Many common models include valves marked with letters. In the classic format, three functions are typically identified:
· A (Air): releases air from the bulb to prepare it for aspiration.
· S (Suction): creates suction so the liquid rises through the pipette.
· E (Empty): releases the aspirated liquid in a controlled manner.
Beyond convenience, using an appropriate aspirator provides key advantages in daily laboratory work:
· Safety: prevents mouth pipetting and reduces exposure to corrosive, toxic, or biological substances.
· Flow control: enables smoother aspiration and dispensing, especially near a calibration mark.
· Lower contamination risk: helps keep liquid away from the upper area of the pipette and away from the operator.
· Repeatability: supports more consistent handling between different users.
Laboratories use several aspiration systems. The best choice depends on the pipette type, volume range, liquid properties, and the level of control required. In general, these devices can be grouped as follows:
These are among the most common tools for routine work with glass pipettes. Their main advantage is simplicity: they require no power, are compact, and offer good control when used with proper technique. In practice, they are used for small to medium volumes and when portability is important.
These devices attach to the pipette and allow aspiration and dispensing through a manual wheel or mechanism. They are often chosen when users need very progressive meniscus control without relying on valves. They are commonly used with graduated pipettes and repetitive workflows.
There are also systems designed to improve safety and fine control, especially when working with sensitive liquids or when exposure must be minimized. This group includes designs with filters, check valves, or features that reduce the chance of backflow into the bulb. The goal is the same: aspirate and dispense safely, while keeping the pipette under control.
Below is a practical procedure based on the classic valve operation. The goal is to aspirate above the mark, adjust the meniscus, and dispense without losing volume control.
Before aspirating liquid, the bulb must be prepared:
1. Hold the bulb firmly with one hand.
2. Press valve A while squeezing the bulb to expel air.
3. Release valve A. The bulb remains compressed and ready to create vacuum.
With the bulb prepared:
4. Attach the bulb securely to the pipette, ensuring a stable seal.
5. Place the pipette tip into the liquid sample and keep it sufficiently immersed to avoid drawing air.
6. Press valve S to start aspiration and allow the liquid to rise into the pipette.
7. Aspirate slightly above the mark or target volume so you can later adjust the meniscus.
Practical tip: during aspiration, it is very important not to lift the pipette tip out of the liquid. If the tip is exposed to air, bubbles can enter and the final volume can be affected.
Once the liquid level is above the mark:
· Keep the pipette vertical and let the meniscus stabilize.
· To lower the level to the mark, use valve E gently so the liquid descends gradually.
· Align your eye at meniscus level and adjust precisely to the correct reference point (according to your lab’s practice and pipette type).
To dispense the content into the receiving vessel:
8. Move the pipette to the receiving container, avoiding impacts on the rim.
9. Press valve E slowly to control flow and prevent splashing.
10. Let the meniscus descend to the mark or to the required volume.
With volumetric pipettes and many graduated pipettes, it is essential not to force the last drops out unless the method explicitly requires it. Many pipettes are designed to drain by gravity after a defined waiting time, depending on standard practice or internal SOPs.
Some diagrams include a blow-out or purge function. In practice, it is used only when the pipette or method requires expelling the remaining liquid. If you use a blow-out pipette (for example, some specific graduated designs), follow the manufacturer’s instructions or your laboratory protocol. Otherwise, avoid blowing out to prevent volume errors.
Below are typical issues when using rubber bulbs and aspirators, along with practical solutions:
· Bubbles during aspiration: keep the tip immersed and aspirate smoothly.
· Incorrect meniscus reading: read at eye level with adequate lighting.
· Vacuum leaks or poor fit: ensure a tight connection; dry the joint if needed.
· Dispensing too quickly: use valve E gently to avoid splashing and volume loss.
· Cross-contamination: clean the pipette and device according to the laboratory procedure.
To maintain performance and safety, adopt these routines:
· Rinse and dry the device as required by the SOP, especially after viscous solutions.
· Periodically inspect rubber and valves (hardening, cracks, loss of elasticity).
· Store clean and dry, protected from heat and direct sunlight.
· Avoid contact with solvents that are incompatible with elastomers when applicable.
When selecting an aspirator, consider:
· Pipette type: volumetric vs. graduated; some workflows need finer control.
· Volume range: higher volumes increase the need for stability and ergonomics.
· Liquid properties: viscosity, volatility, and hazard level affect control and safety.
· Frequency of use: repetitive tasks may benefit from more progressive control systems.
· Quality requirements: regulated labs often prioritize options that simplify cleaning and consistency.
Rubber pipette filler and pipette aspiration devices are essential accessories for aspirating and dispensing liquids safely and accurately. The A / S / E valve layout provides a standardized workflow: expel air, aspirate, and empty with control. By applying correct technique—avoiding bubbles, reading the meniscus properly, and dispensing gently—laboratories can reduce common errors and improve daily reliability.
 Quick delivery
 High quality
 Safe payment